


Long Exposure Photos - Post Yours!
 Mar 13, 2011, 10:38 pm
#181
Join Date: Sep 2003
Location: PVG
Programs: UA 1K
Posts: 240
Pardon the noob question. How do you deterimine the exposure time for these types of shots?
When I just set the aperature and let the camera (T1i) set the exposure time, a lot of the time, it's overexposed/too bright.
When I just set the aperature and let the camera (T1i) set the exposure time, a lot of the time, it's overexposed/too bright.
 Mar 14, 2011, 4:06 am
#182
Join Date: Nov 2010
Location: Baltimore, MD USA
Programs: Southwest Rapid Rewards. Tha... that's about it.
Posts: 4,332
To help determine exposure, use the Info button on your camera to turn the histogram on in your pic review. Learn what a properly balanced histogram looks like, and you'll be able to tell if your pic is under-exposed or over-exposed, and then you can re-shoot with Exposure Compensation.
It takes a while to learn this stuff. Just take it one step at a time.
Mar 14, 2011, 6:35 am
#183
Join Date: Jun 2008
Location: London, UK
Programs: BA Gold, FB Plat
Posts: 396
You should try to experiment with the way you take your pictures and not just rely on setting the aperture as that may not be suitable for all types of shots depending on available light and the depth of field you may require. I'd suggest the following workflow (assuming you're not using a manual cable release/timer);
1) Set the camera to the ISO setting you want. If you're wanting to use AUTO ISO then be careful to watch what it's doing as high ISOs always cause more noise (See point 4)
2) Check your metering setting. Set this to center/spot weighted rather than the whole scene.
3) Set the camera to AV and dial in an aperture that going to give what you want to achieve from the scene, the higher aperture setting, the longer the exposure you'll need (but the greater depth of field you'll get)
4) Compose the scene and half press the shutter to see what the exposure is showing (also note the ISO if you're using AUTO ISO). If it's off the scale (over 30 seconds and flashing) or the ISO is too high for you then adjust the ISO and/or aperture setting (up/down respectively) until you get the exposure under 30 seconds.
5) Take a test shot
6) If your picture is overexposed then the trick is to get the auto exposure (which you've set above to center) to meter on a slightly lighter part of the scene outside of the center metering. Move the camera around and find slightly lighter area in the center, half press the shutter and press the AE Lock (*) button on the back of the camera, recompose the scene and take the picture. You'll have about 5 seconds to do this I recall before AE Lock resets.
7) If it's underexposed then do the opposite of this but note that you might have to go back and adjust the aperture and ISO again to bring it back under 30 seconds.
8) Trial and error!
Always shoot RAW rather than JPG as once you've got the picture on your machine you'll have more flexibility with adjustments as you'll have much more detail in the file (resolution, colour depth, etc).
Once you get used to this then experiment further with ND or ND grad filters to artificially darken the scene to get the effect you want. I've just picked up a ND110 which allows long exposures during daylight so I'm looking forward to playing around with that. Also pick up a cable release with a dial timer which will give you ultimate flexibility and will allow you to shoot with the M setting and get any exposure you want.
Mar 14, 2011, 9:58 pm
#185
FlyerTalk Evangelist
Join Date: May 2002
Location: Pittsburgh
Programs: MR/SPG LT Titanium, AA LT PLT, UA SLV, Avis PreferredPlus
Posts: 31,008
I wish the photos could really do justice here. Middle of Death Valley on the night of a new (i.e. no) moon. With the naked eye it was just unbeleiveable.
30 seconds at f/4

As long as I'm posting...
6 seconds

Hmmm, can't find the other one. I'll keep looking.
30 seconds at f/4
As long as I'm posting...
6 seconds
Hmmm, can't find the other one. I'll keep looking.
Mar 15, 2011, 12:53 am
#187
Join Date: Jun 2010
Programs: AA Plat,PC Plat, HHonors Gold
Posts: 904
Where was it exactly taken from?
Mar 15, 2011, 12:55 am
#188
FlyerTalk Evangelist
Join Date: Mar 2004
Location: SGF
Programs: AS, AA, UA, AGR S (former 75K, GLD, 1K, and S+, now an elite peon)
Posts: 23,194
Neat photos, both!
Mar 15, 2011, 3:29 pm
#189
Join Date: Feb 2011
Location: Washington D.C. via Sao Paulo via Houston via Washington D.C. via Boston via New York
Posts: 1,172
Mar 15, 2011, 3:30 pm
#190
Join Date: Feb 2011
Location: Washington D.C. via Sao Paulo via Houston via Washington D.C. via Boston via New York
Posts: 1,172
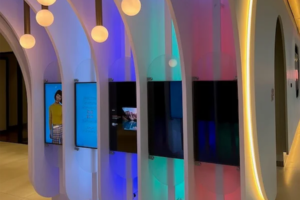
Most of those I posted were taken in Aperture Priority at F/22. I manually the white balance to Tungsten to compensate for the yellowish cast that artificial lights make on a photo, and set the ISO to 200, which made the exposure time come out longer.
To help determine exposure, use the Info button on your camera to turn the histogram on in your pic review. Learn what a properly balanced histogram looks like, and you'll be able to tell if your pic is under-exposed or over-exposed, and then you can re-shoot with Exposure Compensation.
It takes a while to learn this stuff. Just take it one step at a time.
Mar 15, 2011, 10:08 pm
#191
Join Date: Nov 2010
Location: Baltimore, MD USA
Programs: Southwest Rapid Rewards. Tha... that's about it.
Posts: 4,332
Small aperture = wide depth of field.
I wanted a wide depth of field so that more of each pic would be in focus, because many of the pics I was shooting that night were in areas where a lot of stuff was interesting at many different distances from the camera.
Make sense now?
Mar 15, 2011, 11:37 pm
#192
FlyerTalk Evangelist
Join Date: May 2002
Location: Pittsburgh
Programs: MR/SPG LT Titanium, AA LT PLT, UA SLV, Avis PreferredPlus
Posts: 31,008
The Death Valley photo was taken at the edge of the parking lot at the Stovepipe Wells Village hotel where I was staying. They use low wattage yellow lights as part of their dark sky initiative, and they were just right to light up the foreground. I drove two miles down the road to the dunes parking lot, with no lighting, but the images came out like the top 2/3 of the image above - nothing interesting in the foreground and my flashlight wasn't bright enough to light up the dunes in the distance in the exposure time available. I had planned on returning the following night for a longer exposure, allowing the stars to rotate and more time to light up the dunes, but it was cloudy.
One note on apertures - Canon APC cameras start having their sharpness reduced by diffraction at about f/13, and it's significant by f/22, so avoid it if you're looking for maximum sharpness or large printing (12x8 or larger). At 18mm, the hyperfocal distance is 5 feet at f/11, so everything from 2.5 feet to infinity can be in focus, with no diffraction limitation. I carry around a hyperfocal/DoF table in my bag and have one on my phone to do these calculations when shooting.
On the flip side, another artifact of an f/22 aperture is the starburst effect on the bright lights (the 18-200 obviously has a 6-blade diaphragm) which makes for an interesting photo and the diffraction impact is not noticeable at web-posting sizes so if that's your target it's a good option in some situations even when the DoF isn't needed. I have version of the WTC tribute shot at wider apertures to starburst all the lights on the bridge at the expense of sharpness. So aperture choice has multiple technical and creative aspects to it.
Mar 16, 2011, 12:41 am
#193
FlyerTalk Evangelist
Join Date: Mar 2004
Location: SGF
Programs: AS, AA, UA, AGR S (former 75K, GLD, 1K, and S+, now an elite peon)
Posts: 23,194
The Death Valley photo was taken at the edge of the parking lot at the Stovepipe Wells Village hotel where I was staying. They use low wattage yellow lights as part of their dark sky initiative, and they were just right to light up the foreground. I drove two miles down the road to the dunes parking lot, with no lighting, but the images came out like the top 2/3 of the image above - nothing interesting in the foreground and my flashlight wasn't bright enough to light up the dunes in the distance in the exposure time available. I had planned on returning the following night for a longer exposure, allowing the stars to rotate and more time to light up the dunes, but it was cloudy.

I'll leave your technical explanations in your second two paragraphs for others who have the time and funds to pursue photography.
 Mar 16, 2011, 4:01 am
#194
Join Date: Nov 2010
Location: Baltimore, MD USA
Programs: Southwest Rapid Rewards. Tha... that's about it.
Posts: 4,332
The Death Valley photo was taken at the edge of the parking lot at the Stovepipe Wells Village hotel where I was staying. They use low wattage yellow lights as part of their dark sky initiative, and they were just right to light up the foreground. I drove two miles down the road to the dunes parking lot, with no lighting, but the images came out like the top 2/3 of the image above - nothing interesting in the foreground and my flashlight wasn't bright enough to light up the dunes in the distance in the exposure time available. I had planned on returning the following night for a longer exposure, allowing the stars to rotate and more time to light up the dunes, but it was cloudy.
One note on apertures - Canon APC cameras start having their sharpness reduced by diffraction at about f/13, and it's significant by f/22, so avoid it if you're looking for maximum sharpness or large printing (12x8 or larger). At 18mm, the hyperfocal distance is 5 feet at f/11, so everything from 2.5 feet to infinity can be in focus, with no diffraction limitation. I carry around a hyperfocal/DoF table in my bag and have one on my phone to do these calculations when shooting.
On the flip side, another artifact of an f/22 aperture is the starburst effect on the bright lights (the 18-200 obviously has a 6-blade diaphragm) which makes for an interesting photo and the diffraction impact is not noticeable at web-posting sizes so if that's your target it's a good option in some situations even when the DoF isn't needed. I have version of the WTC tribute shot at wider apertures to starburst all the lights on the bridge at the expense of sharpness. So aperture choice has multiple technical and creative aspects to it.
