


Travel Hacks
 Jan 27, 2015, 2:18 pm
#1
Original Poster
Join Date: Sep 2007
Location: Central Mass
Programs: Independent
Posts: 4,829
Travel Hacks
Inspired by the "If you could Mod your Carryon" thread, this is a thread for you to post your travel hacks. Anything you have built, modified, re purposed, etc. to do something you couldn't find a product to do, that did it better, or just plain cheaper.
Last edited by Cloudship; Jan 27, 2015 at 2:26 pm Reason: Add link to old thread
 Jan 27, 2015, 2:25 pm
#2
Original Poster
Join Date: Sep 2007
Location: Central Mass
Programs: Independent
Posts: 4,829
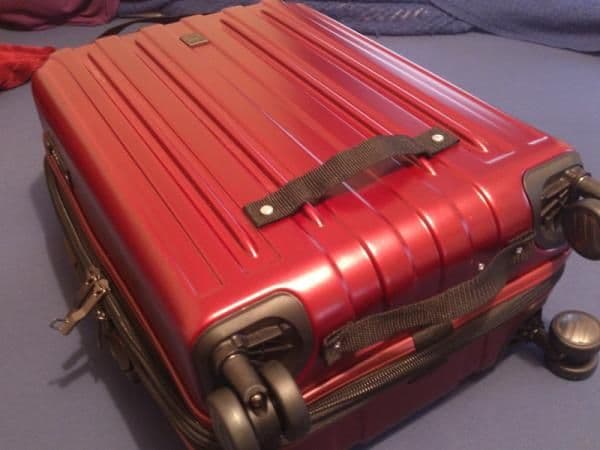
So my first hack. One of my favorite features on my Timbuk2 bag are the two handles on the front of the bag. They make it so much easier to grab and to lift. I am trying out a hard sided suitcase, but missed the handles. So, I simply took a pop rivet gun and a few pieces of strapping and made my own. I put one on the lower front, one on the bottom, in case I put it in the overhead bin handle first, and one on the back. Ever notice that your bags come out the island luggage carousels upside down and face down? This allows me to grab it easily.

Jan 27, 2015, 2:33 pm
#3
Original Poster
Join Date: Sep 2007
Location: Central Mass
Programs: Independent
Posts: 4,829
This one is my favorite. I need a fan when I sleep. But they take up room in my suitcase. I found a solution using a PC fan.
This isn't the cheapest solution, but I figure the weight savings is worth it. I found a PC fan (made by Silvertone) which has a super high air volume output. It is not like a box fan, but enough that you can feel it several feet away. They run off of 12v DC, so I also bout a AC/DC converter with the appropriate connectors. Also, I found a neat speed control that you can plug in to adjust the fan speed. It's nice because you aren't just limited to one or two speeds - it is continuously variable. To hold it up I bought a picture stand at the craft store. It props the fan up so it doesn't fall over.
The one challenge was finding a back grill. They come with only the front grill, and the back grill was hard to find. One of these days I am going to laser cut or 3d print one, as the one I have restricts airflow a little too much.
Jan 27, 2015, 2:38 pm
#4
Original Poster
Join Date: Sep 2007
Location: Central Mass
Programs: Independent
Posts: 4,829
This one on the other hand WAS the cheapest! Inelegant, but it does the trick, at least for a few trips. Not sure how long it will stand up though. Simple piece of cardboard from an old binder, a couple pieces of elastic, and a stapler. It would probably be better to sew them down, but I have no idea how to sew. I have a Sewing Machine, I just dont know how to use it.
I ended up double taping a piece of felt to the back. The staples didn't protrude enough when going through the elastic and the board and so were a bit pointy and snagged. That solved that problem.
Could have made the elastics a bit longer, too.

I ended up double taping a piece of felt to the back. The staples didn't protrude enough when going through the elastic and the board and so were a bit pointy and snagged. That solved that problem.
Could have made the elastics a bit longer, too.
Last edited by Cloudship; Jan 27, 2015 at 2:39 pm Reason: DElete the double IMG tags
Jan 27, 2015, 3:23 pm
#5
Join Date: Nov 2006
Programs: Seniors Bus Pass
Posts: 5,529
Cloudship,
You have re-invented the wheel to save $20!
http://www.cocooninnovations.com/cat_info.php?cat_id=61
You have re-invented the wheel to save $20!
http://www.cocooninnovations.com/cat_info.php?cat_id=61
 Jan 27, 2015, 5:26 pm
#7
Original Poster
Join Date: Sep 2007
Location: Central Mass
Programs: Independent
Posts: 4,829
Cloudship,
You have re-invented the wheel to save $20!
http://www.cocooninnovations.com/cat_info.php?cat_id=61
You have re-invented the wheel to save $20!
http://www.cocooninnovations.com/cat_info.php?cat_id=61
Jan 28, 2015, 8:43 am
#9
Join Date: Sep 2007
Programs: DL Silver, AS MVP, UA Silver, HHonors Diamond, Marriott Plat, SPG Plat, National Exec Elite
Posts: 3,883
There are lots of USB-powered 5V fans out there as well (meaning you could use pretty much any USB charger to power it) in the $15 range (this was the first one I found on Amazon, and it includes front/back grille, stand, and speed control), but if you already had the parts on-hand, kudos for scrapping something together.
Jan 28, 2015, 9:57 am
#10
Original Poster
Join Date: Sep 2007
Location: Central Mass
Programs: Independent
Posts: 4,829
I had tried that one you mentioned, it burnt out on me though. The problem with those is that small PC fans are not normally designed to throw much air for very far, so as a fan they dont work so well. I dug around to find a fan that was specifically designed for high airflow but was still quiet.
If you could figure out how to gang a few fans together, though, that might do a much better job.
If you could figure out how to gang a few fans together, though, that might do a much better job.
Jan 28, 2015, 11:34 am
#11
Join Date: Mar 2012
Location: BUR
Posts: 769
I get this:
http://www.tapplastics.com/product/p...abs_sheets/524
cut to exact specs and insert it in the back of my briefcases. Why? you ask? It makes the backside of the briefcases smooth, thus, making it much easier for you to carry non-paper items and not digg into your sides. It also makes the bag more sturdy and helps it to retain its shape better
Jan 29, 2015, 8:39 pm
#12
Join Date: Sep 2013
Location: Perth, Australia
Posts: 28
not really a mod
I always keep 2 carabiners always attached to my backpack straps. Most backpacks have loops high on the strap that you can thread the carabiners through
Amazingly handy to attach a wet umbrella, shopping bags, anything else you don't want in your hands. If you also pack some cable ties you can attach almost anything
Amazingly handy to attach a wet umbrella, shopping bags, anything else you don't want in your hands. If you also pack some cable ties you can attach almost anything
Last edited by ggf9191; Jan 29, 2015 at 9:09 pm
Feb 7, 2015, 10:34 pm
#13
Original Poster
Join Date: Sep 2007
Location: Central Mass
Programs: Independent
Posts: 4,829
So I made my little tyvek card holder. Decided to forego the foil lining, as it didn't seem to do much to block the RFID, honestly (maybe the foil was too thin). Anyway, this is the finished result and I kinda like it. I used a FedEx envelope. The little notch at the top is so the cards are easier to remove.


Feb 9, 2015, 7:34 am
#14
Join Date: Jun 2007
Location: gggrrrovvveee (ORD)
Programs: UA Pt, Marriott Ti, Hertz PC
Posts: 6,091
Glad someone else thinks it is cool 
My wife's reaction was, "Why didn't you just buy it?" Because it doesn't exist!
I used to have my cards and my cash in the money clip, but decided I didn't like it. I basically had 3 reasons for making this:
1. The magnetic stripes on the cards would wear faster having to slide them in and out of the money clip. After having my corp AmEx fail on a few machines one trip, decided to figure out an alternative (after ordering a new card).
2. The cards/DL "stretched" out the money clip. Every now and then would have to tighten it back up.
3. The cards could be difficult to remove. Related to point one, but a pain when you're struggling to pull out the right card b/c it's in there so snugly.
The little sleeve is enough to hold at 4 cards comfortably, and the little notch allows me to easily pull them out. The adhesive flap from the envelope is VERY useful. No glue involved at all. If I did it again, I'd move the notch closer to the middle, but otherwise, I really like it so far. Total cost was $0 - free FedEx envelope from the mail room.
Feb 9, 2015, 8:55 pm
#15
Join Date: Nov 2014
Posts: 164
Nice! I used to use a straight money clip. My wife got me one of these to hold a couple cards, DL, and money:
http://www.hansonellis.com/zippo-lea...oney-clip.html
Better price here:
http://www.hotref.com/Zippo-spring-l...ip-p-5530.html
http://www.hansonellis.com/zippo-lea...oney-clip.html
Better price here:
http://www.hotref.com/Zippo-spring-l...ip-p-5530.html